
About Orders
In each order summary you can review the total number of tickets sold, the seat assignment(s), an itemized list with prices that lead to the order total, what fees were collected and/or waived and by whom and the method of payment. Additionally, an order summary displays the agent that processed the order, the email delivery statistics, customer contact information, whether coupons were redeemed, comments and annotations, survey answers, browser information and unique barcodes with scanning details. The tasks of issuing an exchange, refund, void and re-sending an email confirmation containing the printable electronic pdf ticket are performed within the order summary as well.
The overview is written based on common event types and should be considered an overall strategic guide. It should not be considered a detailed instruction manual for every function and option.
Most of the functions and options throughout the area where order summaries are viewed have brief supporting text (Example: “Why is this missing?”) near the input fields you will be using to help guide you to an effective search.
As always, we offer a wealth of information about the software on our Support forum where you can read the questions other users have asked in the past, of if need be, ask a new question of your own.
Additionally, we offer detailed video tutorials covering Order Details along with Ticket Order Changes.
Quick Start / View an Order
If you are in a hurry, below is the “Quick start” that represents the minimum required actions to quickly review the list of all orders and then view individual order summaries. Please follow the instructions below.
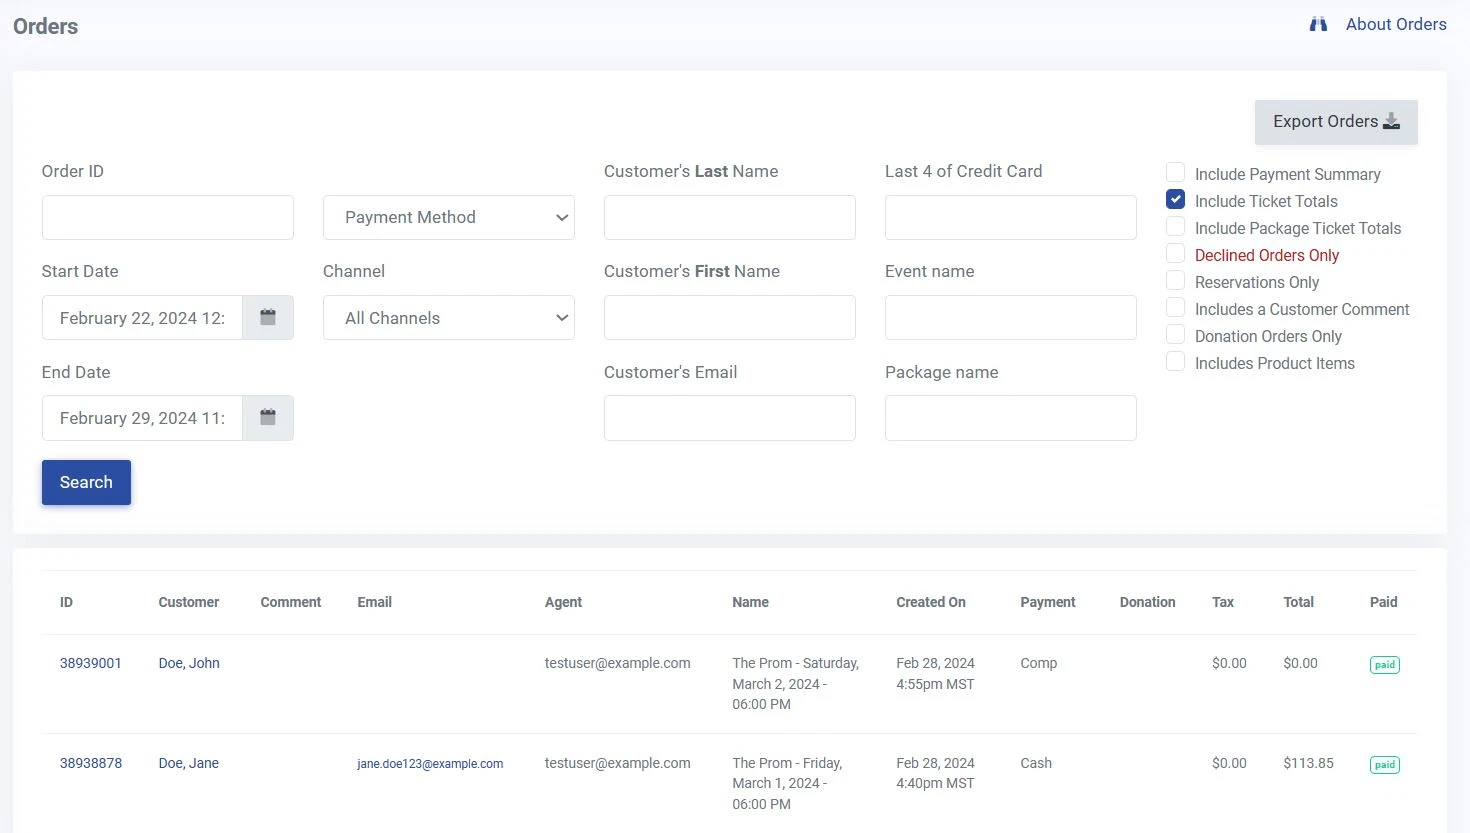
1. After clicking on the ‘Orders’ tab in the main black navigation bar, the Orders Page will load.
2. The Order’s list is, by default, only going to display recent orders. Depending on the volume of orders you have, the list will display the forty most recent orders placed.
3. If you haven’t had any recent orders, the list display may appear blank. To view more orders, alter the date range selection and click “Search”. The page will refresh with a helpful ticket total summary as well.
4. Select which order summary you would like to view by clicking the order ID number in the first column. The order summary page will load.
Overview
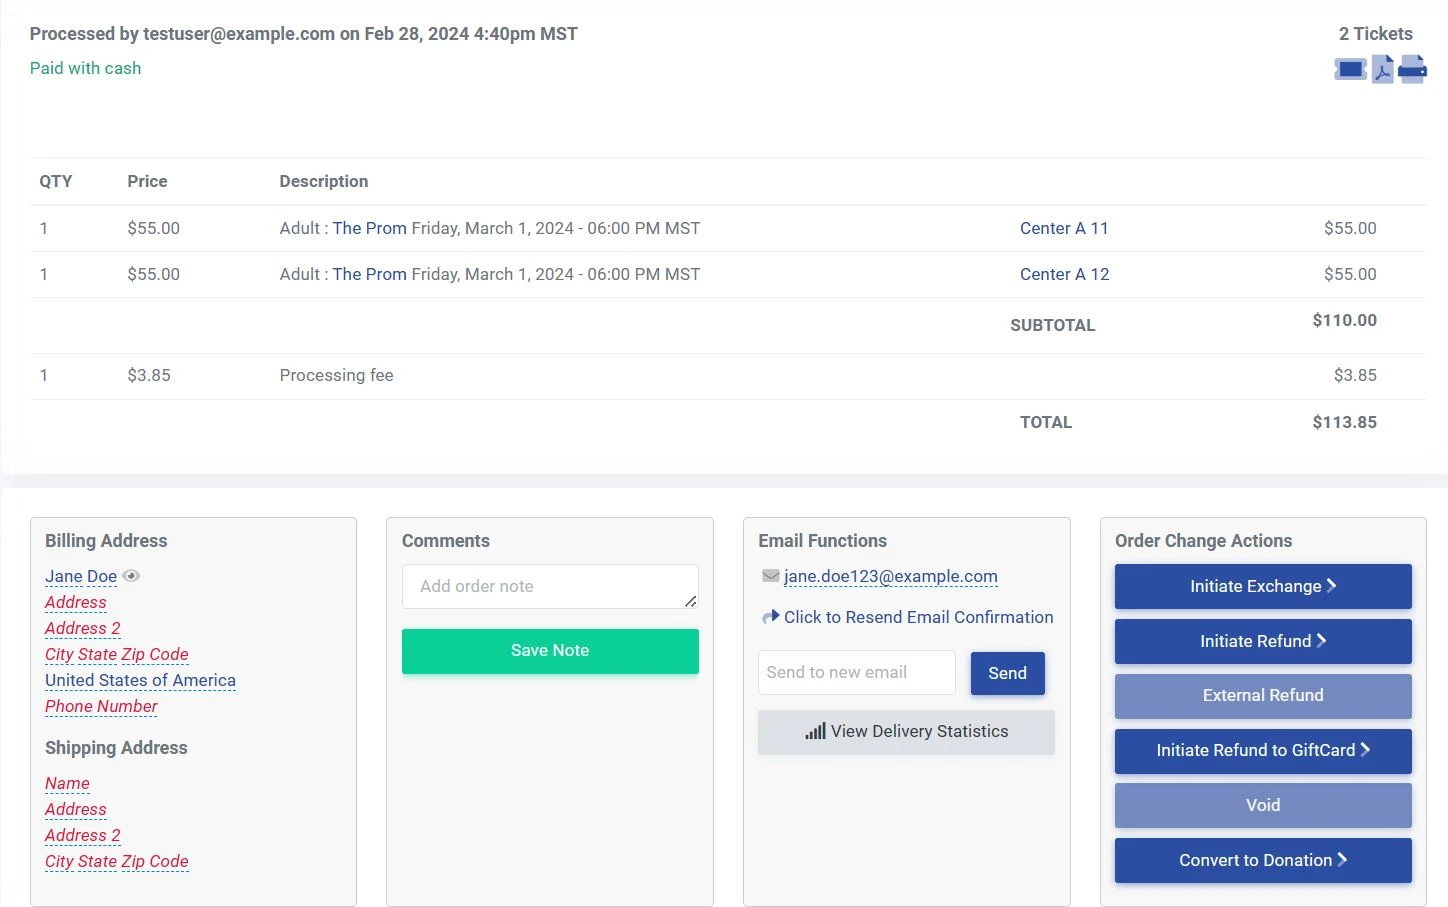
An order summary has four primary areas, they are:
A – Totals
B – Order information and annotation
C – Post-order actions
D – Order options
Within each primary area, the following tasks can be performed
A – Totals
An order summary displays various total amounts that can be viewed at-a-glance to give you an idea of the success of the sale. Each total amount is specific to the order. To view more than one order summary total (sales by type in aggregate) use the ticket order search function.
In this area you can view the following totals:
- Ticket quantity purchased, price paid per ticket, and description
- Dollar amounts paid as line items and in the transaction as a whole
You can also
- View the payment type used, seat assignment (if applicable), fee overrides made and by whom
- View coupons redeemed
- Reprint thermal and PDF tickets
B – Order information and annotation
During the purchase process there are prompts requesting ticket buyer information used for credit card verification and the sending of email attachments. An order summary will display this information for review and for your patron management database.
In this area you can view the:
- Billing address
- Shipping address
You can also:
- Review any comments made buy the ticket buyer (during purchase), the sales agent, or the administrator (after purchase).
C – Post-order actions
Strictly for internal use are the available post-order tasks to be applied by staff in the box office or while supporting a ticket buyer over the phone.
In this area you can:
- View or edit the email
- Resend the email confirmation
- View the email delivery statistics
You can also:
- Issue exchanges
- Issue refunds
- Void orders
- Convert an order to a donation
D – Order options
The optional order summary information displayed is depending on how the event was originally created. Reminder, even with orders already made for an event, you can make changes to some of the event options to be displayed during purchase.
In this area you can view:
- Survey answers
- Post event survey responses
- General information about the web browser used during the purchase
You can also:
- Print the order summary
- View the unique barcodes, whether they were scanned, and the time of scan.
Please review the Order’s how-to guide for detailed instructions on performing order searches.
Totals
For each ticket purchase made, an order identification (ID) number is created and kept in your account. These order IDs accumulate over time and eventually will require you to use the Orders page to consult, sort and review order summary totals.
The frequency at which you view totals varies. You may be performing a month-end sales total, or you may need to see the number of orders made for one or more events. Note that order sorting can be performed by the order attributes that appear at the top of each column of the Orders Page.
As you go about viewing order summary totals, there are some things to consider…
Tickets Purchased
Every order summary includes the quantity of tickets purchased, the face value price and fees (if any, since we allow you to sell tickets with no fees) paid and whether or not fees or price overrides were applied. These should meet your expectations on sight, but the in-depth information is there to confirm your expectations.
Note that the number of tickets purchased will be divided by the ticket type as one line item, and the fees and service charges as another for clarity. If the quantities of ticket types, fees and service charges were combined together as a single line item, you may not be able to consult the sales agent who made the purchase as review why he or she waived a certain fee.
The dollar amounts shown for an order summary are formatted in the traditional manner, with line items for each, then subtotaled and, ultimately, the total amount paid for the order.
Seat Assignment
Every order summary includes the seat assignments per ticket. Depending on whether the event is reserved seating or not, this ranges from “General Admission” to exact seat numbers within a row in a certain section of the venue.
Please review the reserved seating guide for detailed instructions on our reserved seating software.
Coupons and Fee Waivers
In the itemized list of actions taken during the purchase process, an order summary shows which coupons were redeemed.
Your coupon redemption rate can be seen in aggregation on the Coupons Page, but its very highest resolution is shown per order in the summary. This information is presented for the purposes of both business intelligence and sales velocity. While reviewing individual order summaries you may become aware of one particular coupon being redeemed at an excessively high rate. Conversely, a coupon thought to be especially inciting is not being redeemed at all. As all interpretations are subjective, the order summary shows a high level of coupon usage data without filters or abbreviations.
Please review the How-to Guide for detailed instructions on using coupons.
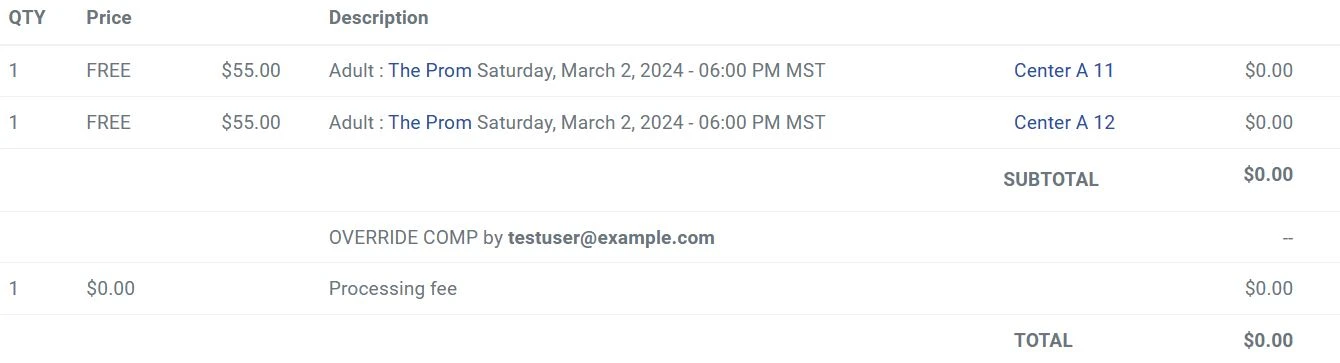
Mentioned briefly earlier, the waiving of fees, as seen on an order summary, is important information.
Ticket purchase price modifications, along with fee and service charge overrides are shown for each sale in the order summary. What may be the most important display item of all is who made these modifications. If you have given remote sales agents and box office staff the account credentials to perform overrides and waivers, they will be displayed by name. Should, for example, you see an unexpected waiver occur, you may make note of it, and then query that same person by name in a general order search, to give a broader view of their activity.
Unexpected fee waivers may also denote ticket buyers taking great exception to one or more fees and/or service charges you have applied to an event. This may be an opportunity for you to lessen or remove outright the fee that is being continuously overridden. Changing the number and dollar amounts of fees and service charges is performed on the Events Page.
Order Information and Annotation
As seen on each order summary, the ticket buyer contact information, as well as any notes written for the order itself are shown. Contact information is, of course, extremely valued in and of itself since so many other tasks are associated with it. Notes written either by the ticket buyer or the sales agent are unique to the order summary being reviewed. The information conveyed therein can vary widely since it is a voluntary action taken at the point of sale.
Before you begin to review the order information and annotations, there are a few things to consider.
Ticket Buyer Contact Information
Whether the purchase was by a event attendee, a remote sales agent, or by you, the fields promoting for name, billing address and the all important email address are requirements. The terse nature of these fields reflect their importance and you would do well to take the time to review their contents on a per order basis.
Billing addresses are deeply tied to order fulfillment should the means to send physical tickets be offered. Missing billing information should be a red flag that an order is actually incomplete, and a ticket delivery will not occur. Of a lesser concern would be purchase that do not have buyer contact information but were made as cash sales, in-person, at the box office. If this scenario is the case, you may find this was a missed opportunity to cultivate your mailing list, a crucial aspect of marketing for events and your business.
Email addresses shown in the order summary are a “must have” if the event is offering Print-At-Home PDF tickets. An incomplete, or worse, fake, email address entered means your customer doesn’t have what they need to print their tickets. It also means the task of re-sending email(s) will not be possible. Emails shown in the order summary were entered buy the buyer, or the sales person, so they should always reflect actual, real world points of contact, for the purchase made as well as in the future. Sometimes, even with accurate email addresses entered, customers claim to be not receiving emails from your events. In this case, they make be experiencing delivery problems.
Ticket Buyer and Administrator Comments
Ticket buyers, your customers, have the means to write a comment as they complete the purchase process. These comments may vary wildly, from critical questions about the purchase, to a passing thought on how much they are looking forward to the event. The ticket buyer comment may also reflect confusion or a lack of understand about the sale, which should give you pause. Questions shown in the order summary reflect some of the most honest customer feedback available in retail, treat them as the valuable resource that they are.
Sales agent or administrator comments are made for the purposes of additional sales context. Walk-ups, will calls, and in-person sales may have special circumstances surround them (Example: Performer had a sudden addition to the complimentary ticket needs.) so the order summary displays any and all comments made in that context. The comments may also be an extended statement as to why a fee or service charge was modified or waived. If you receive negative comments directed towards ticket fees, consider whether or not you want to charge event ticket fees. Prompts for comments do not come with any restrictions or need for context. Reviewing all comments made, per order, lends more meaning and reason to a sale that deviates from the norm.
Post-Order Actions
Once an order is complete, there are several powerful actions that can be taken afterwards to ensure the sale meets and exceeds everyone’s expectations. Resolving issues like refunds, exchanges, voids, re-sending emails, and reprinting lost tickets are performed in this area of the order summary.
Before reviewing or performing any post-order actions, there are some things to consider.
Reprinting Thermal Tickets

You or event staff may need to look-up an order and review the purchase details. In addition to reviewing the order purchase details, the thermal and PDF versions of the ticket may be reprinted. Here’s how:
1. Click on the order ID number in the list display. The order details page will load.
2a. Click the ‘Reprint Thermal Ticket’ (first icon) button and a new browser tab will load containing the ticket data. Use your browser’s printing workflow to send the ticket to a supported thermal printer.
–OR–
2b. Click the ‘View e-Ticket'(middle icon) button and a new browser tab will load containing the PDF ticket image. Click the printer icon in the right hand corner to send the ticket to the laser or inkjet printer available to your desktop computer.
2c. Click the ‘Reprint e-Ticket’ (last icon) button and a new browser tab will load containing the PDF ticket image. Use your browser’s printing workflow to send the ticket to the laser or inkjet printer available to your desktop computer.
Please review the support pages for more information on reprinting thermal tickets.
Email Functions
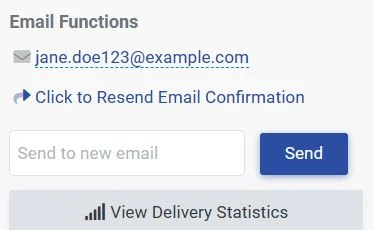
The View Delivery Statistics button displays the delivery statistics for the custom event emails, email reminders, and post-event emails. Each email sent shows the specific times they were sent, received, and opened, in addition to bounced emails for various reasons. Since emails can often be lost or looked over, here you can easily resend the confirmation email to the customer or send it to a different email address.
Making Exchanges
Should the need for staff in the box office to make an exchange of tickets, the task can be performed starting with the list of orders on the ‘Orders’ page.
1. Click “Initiate Exchange”. You will then be presented with the exchange page.
2. Select the number of tickets you would like to exchange under “Quantity”. You can also click “select all” to exchange all of the tickets in this order.
3. Check your information and select an option from the menu below. Here you can change ticket types, exchange for the same date and time, exchange to a new date and time, and exchange to a new event. 
4. After you have selected an option from the menu, it will load the seating chart for the event if it is reserved seating or it will load an order screen if it is a general admission event. If it is a reserved seating event, you will need to exchange the customer into new seats. If it is a general admission event, simply enter the ticket quantity needed by the desired ticket type.
5. Click “continue”, choose the appropriate ticket types based on the original order, and hit continue one last time. This screen is where you can confirm that the ticket types and shipping options are correct before proceeding to the last step.
6. If there are any price differences such as fees or if a patron upgrades or downgrades their seat, it will take you into a new order. Here you can remove fees or adjust prices if needed and charge/refund the customer as needed.
7. Finally, just click ‘Confirm Order’ at the bottom and you are all set!
Notice that the order has brought over all of the customer’s previous billing information onto the new order. Take a look at the new total of this transaction. If you offer exchanges as an included service at no charge, you’ll want to “waive the fees” since the customer will have already paid the fees on the original order. If it’s not an even exchange and the new order is greater in cost than the original order, the patron will need to pay the difference. This will automatically return the original seats back into your inventory for the previously ordered performance so that they can be re-purchased. Additionally, both exchanging and refunding the seats invalidates the barcode IDs from the original tickets so that the tickets cannot be scanned.
Follow along with our detailed video tutorial Ticket Order Changes covering Exchanges, Refunds, and Voids.
Issuing Refunds
Should the need for staff in the box office to issue refunds of ticket purchases, the task can be performed starting with the list of orders on the ‘Orders’ page.
1. Click on the order ID number in the list display. The order details page will load.
2. On the order detail page, click the ‘Initiate Refund’ button. The ‘Refund Order’ page will load.
3. After reviewing the order information, click the checkbox next to each ticket you’d like to refund. Also make sure to click the checkbox next to ‘Release’ to ensure that the seat gets returned to inventory. The option to edit the refund amount in dollars, as well as the option to type a reason for the refund is available at this time. You may refund either tickets or dollars alone, or refund both.
4. Click the ‘Process Refund’ button, located in the lower right of the page.
The refund is processed immediately if the tickets were purchased using a credit card. Cash refunds are based on venues policies.
Alternatively, many prefer to refund the total amount to an electronic gift card for use on future purchases of available tickets and products. The refund process is the same as above, except the transaction begins with the “Initiate Refund to Gift Card” button.
Voiding Orders
Orders are batched or processed by your payment gateway (Examples: Authorize.net, Paypal, Beanstream, etc.) nightly. As long as an order has not been batched, you may void the order and return all money to the purchaser. This usually applies when a purchase is made during the day and you are attempting to void the order prior to midnight on the same day.
To void an order, take the following steps:
1. Search for an click on the Order ID to access the order information.
2. Click ‘Initiate Void’. This button will be grayed out if the order was placed one or more days in the past.
3. Enter a reason for the voided transaction.
4. Click ‘Process Void’.
Please note that a void essentially cancels an order. Therefore, you may not alter the dollar amount or the number of tickets being returned.
Should you receive a warning, the transaction may have settled or your gateway does not allow voids through their API.
Order Options
Ancillary information gathered during the ticket purchase process may have more value than you are currently assigning. Should your customer take the time to answer your custom survey or have their browser configured in such a way as to lower the quality of their buying experience, you need to take note.
Before reviewing the available optional data in an order survey, there are some things to consider.
Surveys
Custom surveys can be part of a larger effort to improve the quality of service or bring your attention to areas of an event that need changing. How you build a survey is up to you and they should be utilized with care.
When viewing an order summary, the answers to surveys are at the bottom of the screen. The answers reflect what was written at the time the ticket buyer first began the purchase process. Depending on the nature of what was asked of them, the answers can be combined with any note written at the end of the process.
You can also used the survey answers to gain critical insight into the overall user experience and apply that information to future marketing of events. As always, we urge you to make surveys optional and reserve mandatory answers only for the most business critical tasks, if at all.
Browser Information
Often overlooked are the ticket buyer’s web browser statistics. When your customer first arrives on your website to buy tickets, your ThunderTix account attempts to gather basic information about their computing environment. Browser type, version, and some lesser know settings are displayed in the order summary as a service to overall customer satisfaction.
Of note, the implementation of web browser data is somewhat recent and is not retroactively applied. Orders made before this feature was implemented will not contain any browser data.
Valid Barcodes

Each order summary displays all of the unique ticket barcodes for the order, whether they were scanned, who scanned them, as well as when they were scanned. For primary users, you also have the ability to “un-scan” a previously scanned ticket. You might want to take this action if you’ve accidentally scanned a ticket for testing our mobile scanner apps or when a customer is exiting your event with expectations to re-enter. Enhance your event security to protect against ticket duplication and costly fraud with real-time barcode ticket scanning.