This how-to guide will teach you about the event sales reports ThunderTix offers to track your event sales, ticket totals, product sales, and more. If you have additional questions, check out our other report guides, the event reconciliation reports guide, and the event dashboard guide. Furthermore, be sure to take a look at our event software reports video or visit our support forum.
About Reports
When you sell tickets to your event, it's important for you to able to access sales data. ThunderTix offers many options for ticket sales reports and exports. There are two places you can access sales reports for your events, these are the reports menu tab or the events page. This guide explains all the reports available on the events page and event management pages.
To access reports for specific events or event performances, visit the reports column on either the events page or event's management page. If you want to generate sales reports for specific performances of events or export guest lists, settlement reports, coupons redeemed, barcodes, ticket lists, product sales, as well as survey responses and waiting lists then you must click manage next to your desired event. Once you click manage, you will see this page below.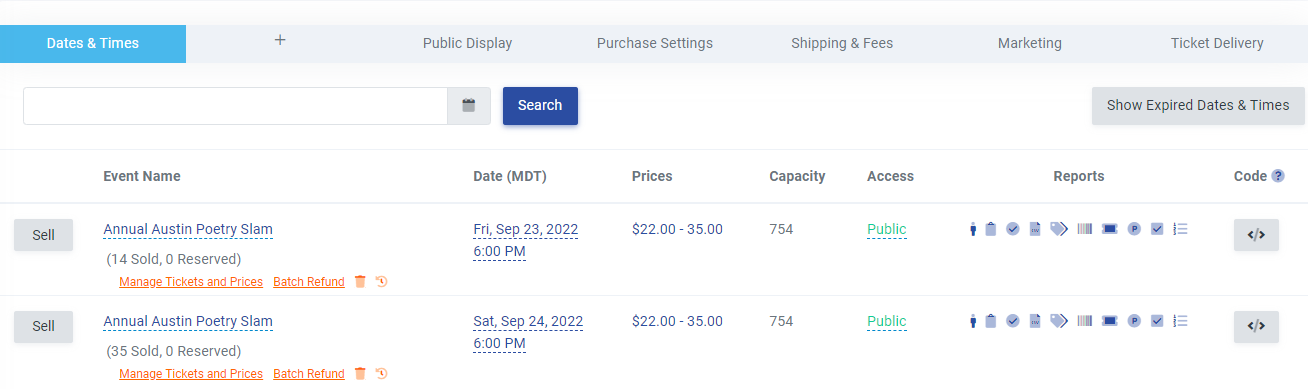
However, if you want waiting lists and event settlement reports for all the dates of an event, you must be on the main event's page as shown in the image below.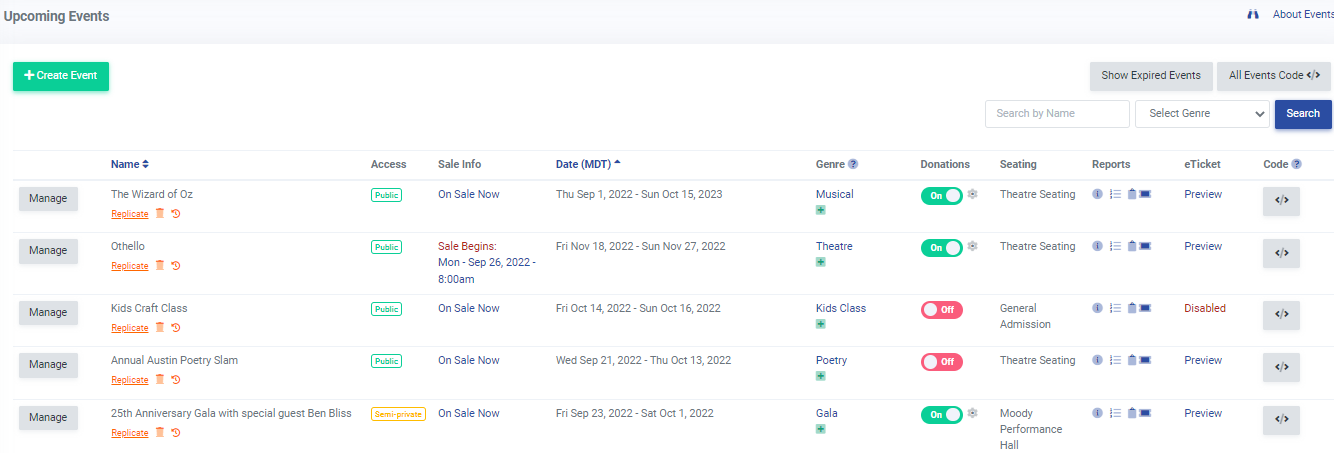
Once you export a report, it will either be in a PDF file or a CSV file. If it is a PDF, you just need to click save in the upper right corner of the page. If it is a CSV file, you can open and save the file in your desired application (Microsoft Excel is a common choice).
Quick Look at An Event's Sales
If you need to quickly see how well an event is selling, follow these steps:
- Click on the Events tab, located in the left-hand navigation menu.
- Click on the 'i' icon under the Reports column for your desired event. This will show you the event's total tickets sold, orders, exchanges, fees, donations, shipping, as well as the gross total for revenue and orders.

The Events Page
The main events page allows you to download event-wide reports that span multiple performances rather than for a single performance. The waiting list and event settlement report are two available event-wide reports.
Multi-Event Waiting List
The event waiting list compiles all waiting lists for all dates of an event in a single view. This is especially helpful for organizations with recurring dates or potentially hundreds of dates for a single event.
Event Settlement Report
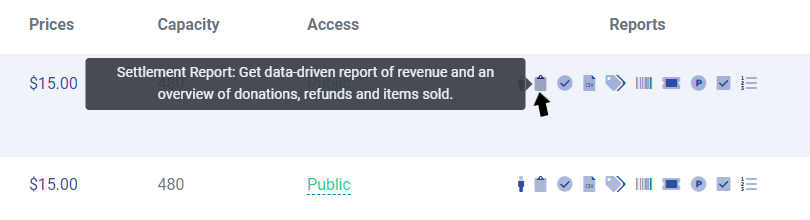
The event settlement report gives a comprehensive financial overview of all event dates. Specifically, the settlement report displays tickets sold by type, fees collected, refunds, discounts, coupons given, sales tax and more. However, it's important to note that the event settlement report is limited to events with no more than 25 performances. You can also pull an event Settlement Report for a specific performance if needed.
Once you have navigated to your Event Manager page, click on the list icon in the reports column corresponding to your desired event to export the waiting list or click on the clipboard icon to export the event settlement report.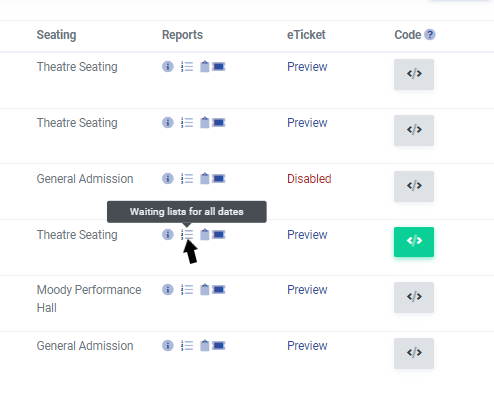
Event Management Pages
Every event page will allow you to access single event performance sales reports or export guest lists, settlement reports, coupons redeemed, barcodes, ticket lists, product sales, survey responses, and waiting lists. To get to a specific event's page, you need to:
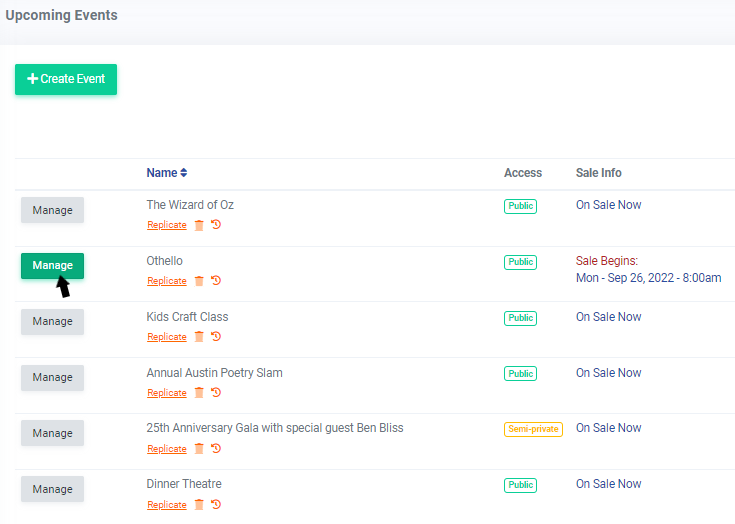
- Click on the Event Manager option under the Events tab in the left-hand menu.
- Click on the Manage button located next to the event.
Once you're on a specific event's page, you can access reports for each performance in the reports column located to the right of the page.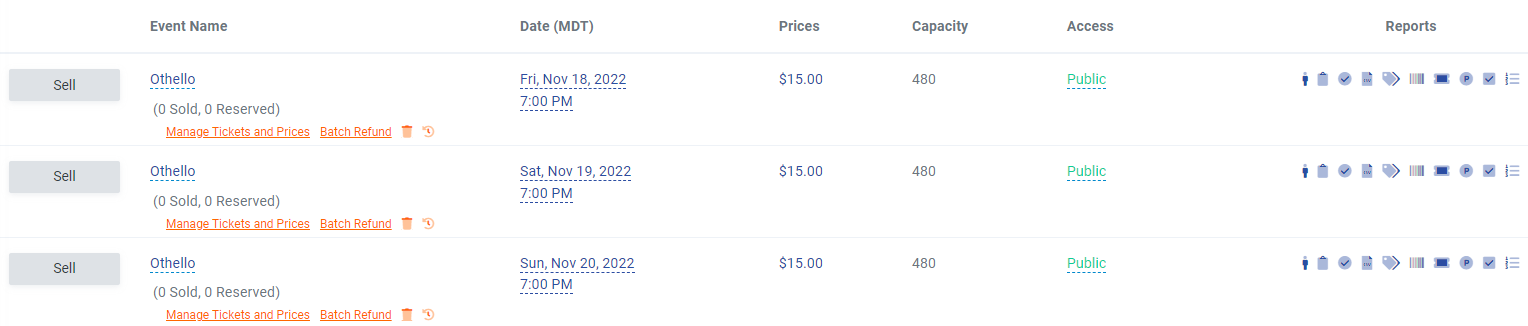
Single Event Performance Sales Reports
The Settlement report can give you a comprehensive financial overview of a specific performance from tickets sold by type, fees collected, refunds, discounts, coupons given, sales tax and more. From any specific event's page, you can access a sales report for each performance of that event.
To generate a sales report for a specific performance of an event, you must:
- Be on that specific event's page.
- Click on the bar graph icon in the row corresponding to your desired performance time. Then a new browser tab will open the downloads page.
- Click on the "Click here to download" text. Then a popup will appear asking what application you would like to use to open the report.
- Choose what application you want to open the CSV file in.
- Save the report to your desired location once opened.
Exporting Guest Lists
Every event will have a guest list you can access. You can also check in guests through this list if need be. To do this, you need to click on the person icon button.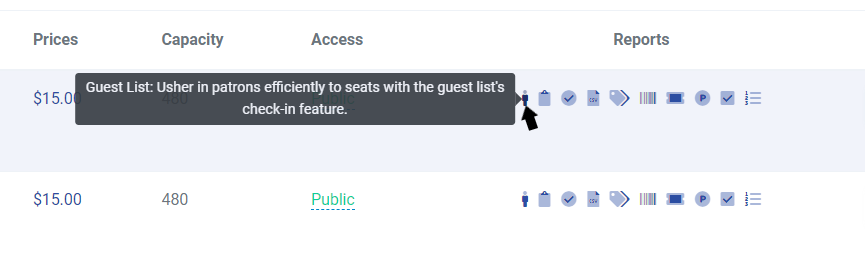
From this guest list page, you can check-in guests by clicking the "Start Guest Check-in" button.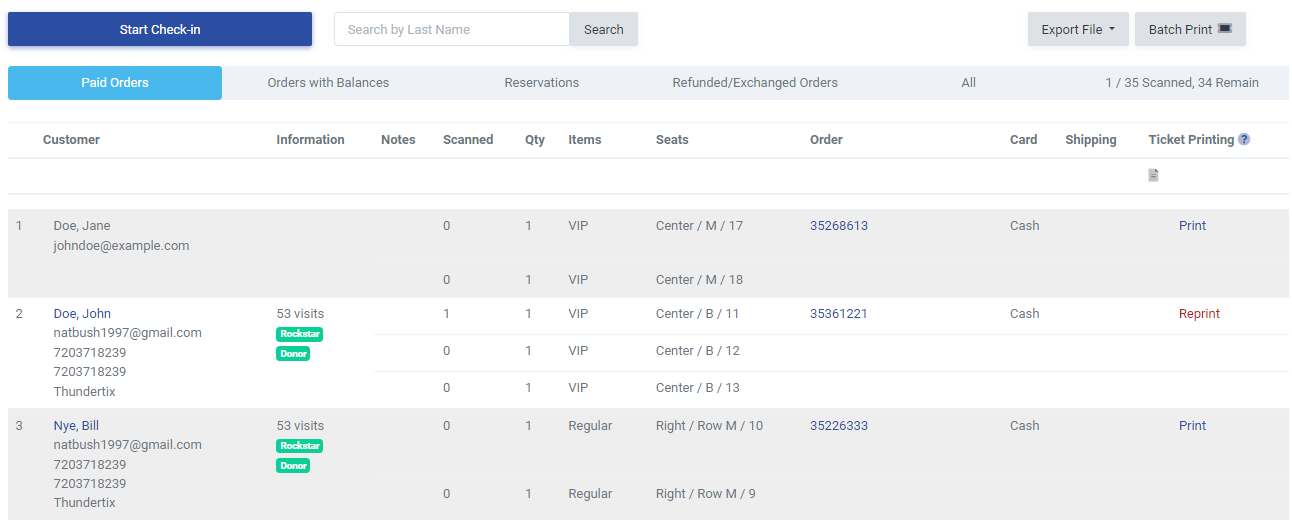
You can export the list as well from the check-in page by clicking the Export button in the top right corner.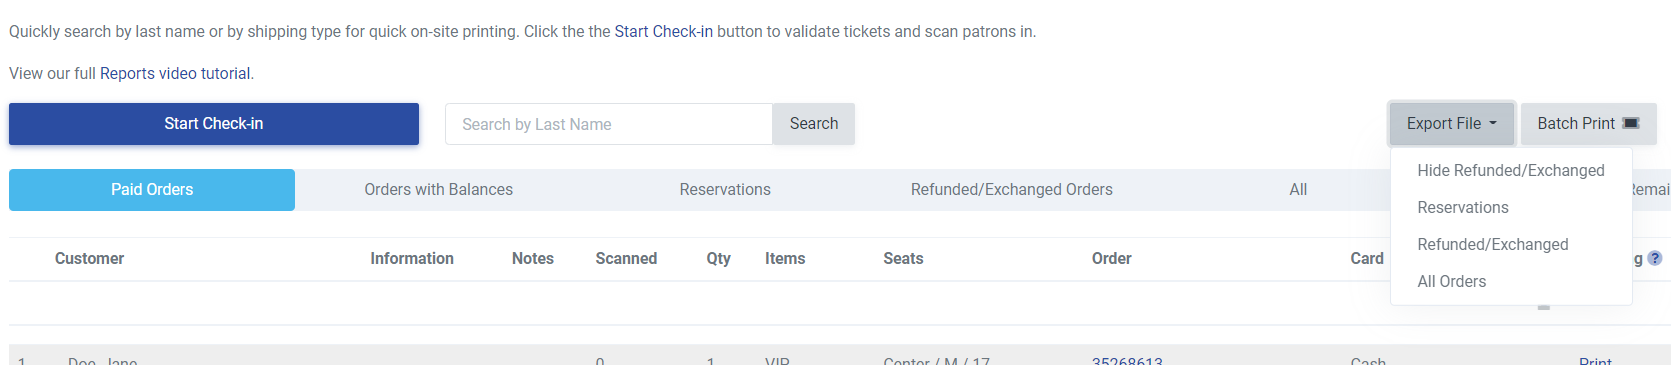
You can also export the guest list for any event performance from the specific event's page. To export the guest list, you need to:
- Click on the check icon in the row corresponding to your desired performance time. A new browser tab will open the downloads page.
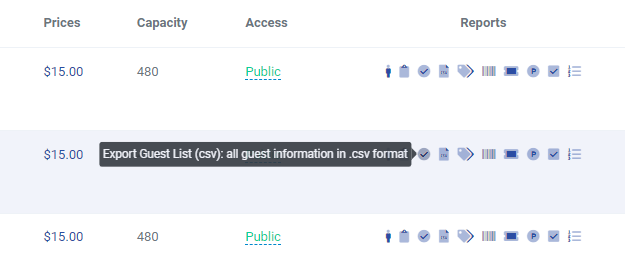
- Click on the "Click here to download" text. A popup will appear asking what application you would like to use to open the report.
- Choose what application you want to open the CSV file in.
- Save the report to your desired location once opened.
Exporting Coupons Redeemed
ThunderTix offers the ability to create event coupons as well as the ability to access coupon reports. Exporting the coupons redeemed list will show all the coupons redeemed for an event as well as the corresponding customer names and order numbers. To export this list, you need to:
- Be on that specific event's page.
- Click on the tags icon in the row corresponding to your desired performance time. A new browser tab will open the downloads page. When your download is ready, a pop-up will appear.

- Click on the "Click here to download" text. A popup will appear asking what application you would like to use to open the report.
- Select what application you want to open the CSV file in.
- Save the report to your desired location once opened.
Exporting Barcodes
Venues often need to scan, view, and export barcodes. ThunderTix offers these abilities and more. You can also buy Barcode Ticket Scanners from the Hardware tab of your ThunderTix account.
Exporting the barcodes for an event gives you a list of all the patrons, order IDs, ticket types, as well as barcode ID's. This report will also show whether or not the barcode has been scanned and by whom. Furthermore, scanned barcodes will be marked with a "1", while a "0" indicates an unscanned barcode.
To export the barcodes for an event, you must:
- Be on that specific event's page.
- Click on the barcode icon in the row corresponding to your desired performance time. A new browser tab will open the downloads page. When your download is ready, a pop-up will appear.
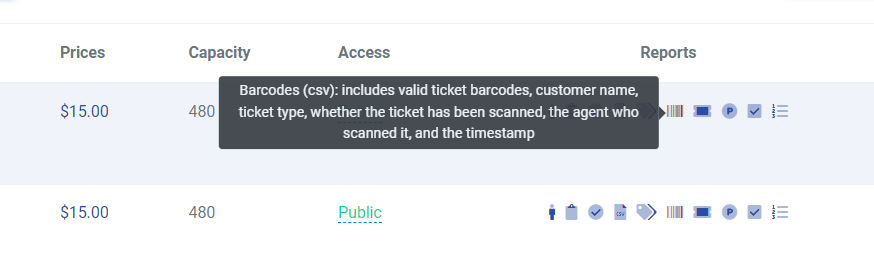
- Click on the "Click here to download" text. Then a popup will appear asking what application you would like to use to open the report.
- Select what application you want to open the CSV file in.
- Save the list to your desired location once opened.
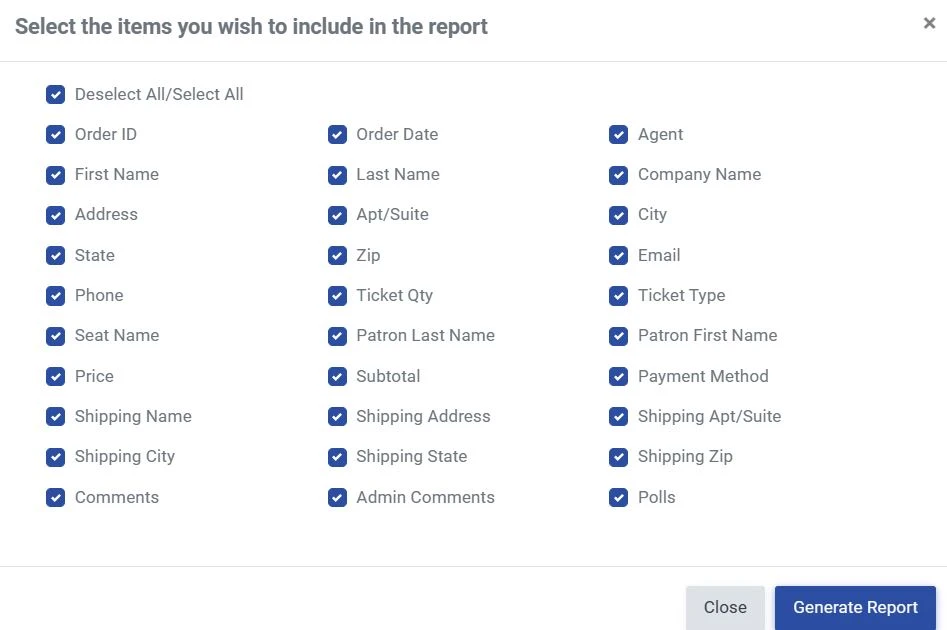
Exporting a Ticket List by Type
You can access a ticket type list for any event performance, which shows every customer's purchased ticket type, price, amount paid, order ID, order date, and more. To export this list, you need to:
- Be on that specific event's page.
- Click on the ticket icon in the row corresponding to your desired performance time. Then a new browser tab will open the downloads page. When your download is ready, a pop-up will appear.
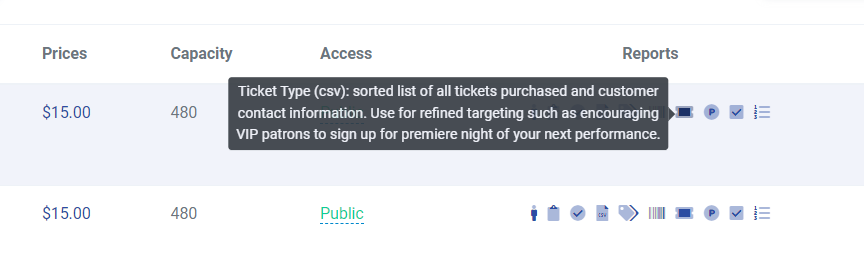
- Select the options you'd like to include in the report from the pop-up menu. Once you have made your selections, click "Generate Report".
- Click on the "Click here to download" text. Then a popup will appear asking what application you would like to use to open the report.
- Select what application you want to open the CSV file in.
- Save the list to your desired location once opened.
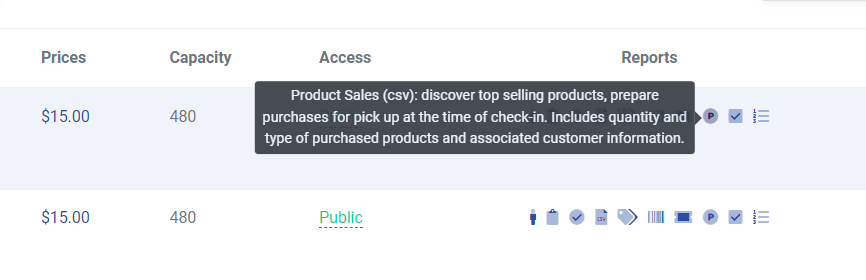
Exporting Product Sales
You can access a product sales report for each performance of an event. This report shows you the order ID, performance name, the customer associated with the order, as well as the products purchased.
To export this list, you need to:
- Be on that specific event's page.
- Click on the p icon in the row corresponding to your desired performance time. Then a new browser tab will open the downloads page. When your download is ready, a pop-up will appear.
- Click on the "Click here to download" text. Then a popup will appear asking what application you would like to use to open the report.
- Select what application you want to open the CSV file in.
- Save the list to your desired location once opened.
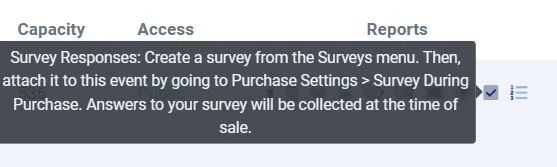
Exporting Survey Responses
You can access all the survey responses for an event date. This report shows you information about customers who answered the surveys attached to your event.
- Be on that specific event's page.
- Click on the check mark box icon in the row corresponding to your desired performance time. Then a new browser tab will open the downloads page. When your download is ready, a pop-up will appear.
- Click on the "Click here to download" text. Then a popup will appear asking what application you would like to use to open the report.
- Select what application you want to open the CSV file in.
- Save the list to your desired location once opened.
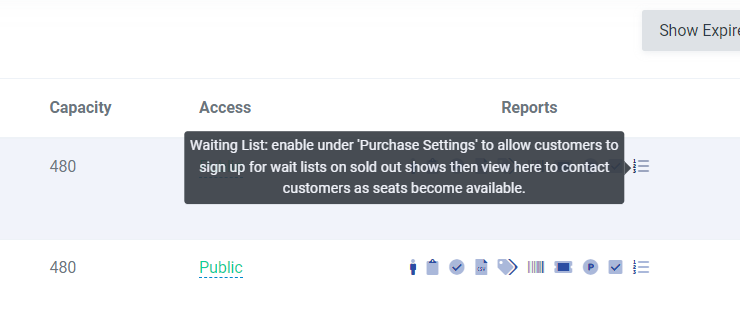
Event Wait Lists
You can view your wait lists for any event performance. Waits lists allow your customers to enter their information if an event is sold out. You can enable wait lists for your events during the event creation process or in the purchase settings of the event management page.
- Be on that specific event's page.
- Click on the list icon in the row corresponding to your desired performance time.
Then you will be taken to the waiting list page as shown below. From here, you can see all the customers on the waiting list for this performance. You can also access customer emails, how many tickets they want, other comments, as well as a way to remove the customer from the waitlist or mark if the customer has been notified.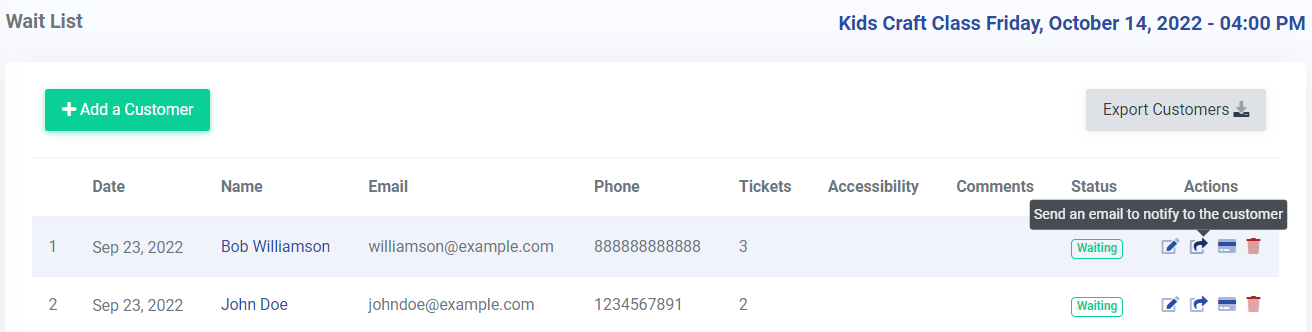
There are different statuses for the Wait List, as seen below.

Ready to Purchase- This means that the customer has indicated that they are ready to purchase the tickets from the waitlist.
Waiting- This means that the customer has not been notified of any available tickets and is waiting to be notified if tickets become available.
Purchased-Order: with an order ID- This means that the customer has successfully purchased the tickets that become available on the waiting list.
Inactive- This means the customer has been removed from the waiting list. Either manually or they have indicated they are no longer interested in the tickets.
Notified- This means that the customer on the waiting list has been notified that tickets are available for them to purchase. ![]()