New Look for Assigned Seat Select
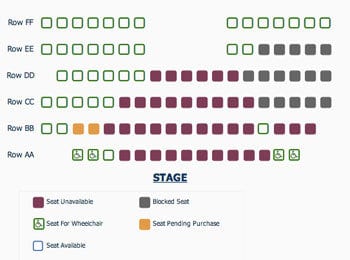
We've updated the look of our assigned seating -- select-a-seat -- view for both public and private users. The new reserved seating display is more visually pleasing and responsive for all devices. The new appearance has been cross browser testing across all devices (phone, iPad, laptop). A preview of the new appearance of an assigned seating chart is displayed to the right. Wheelchair seats are properly labeled and easy to spot with the new wheelchair icon within those designated seats.
New Optional Requirement for Name-Per-Ticket
In our first roll-out of this feature, you can choose to require a name per ticket for each ticket ordered. This means that both public and private users will be required to enter a patron name for each ticket ordered. We strongly encourage you to consider whether this is absolutely essential as requiring extra information--especially of a personal nature--can affect the number of people who may abandon a purchase. In the future, we'll be adding an optional collection of patron information.
Scan for Multiple Events
Some organizations prefer to have VIPs entering in the venue through a single fast-flowing gate where general admission buyers are not allowed to enter. This keeps the VIP entrance moving faster and prevents VIP guests from having to wait behind a slower moving line with more people. Other organizations might allow holders of 1-, 2-, or 3-day passes to enter any gate throughout a weekend. With our new multi-choice scanning option, you may select any combination of events, dates and times then scan tickets for all of them using a single scanner.
New Required Field for Checkout
If your venue requires everyone who attends the event be over the age of 21, you may want to enforce their acknowledgment of that rule with a required checkbox field before purchase. In order to add this required field, just click on Account Settings in the upper right corner, click on the link under Venue, and scroll down to Checkout Page Settings on the right. Enter the verification text in the field labeled Optional Required Field Before Checkout, and the new requirement will appear on the checkout page for public purchasers.