The following guide will walk you through the necessary steps to successfully install and configure your Practical Automation iTX printer. If you are new to thermal printing, please review the 'How does thermal printing work?' section of the feature page and read our three-part whitepaper!
Thermal Printer Installation Instructions
- Install your Practical Automation iTX printer using the CD included with your printer, or Download the Practical Automation iTX Driver from their website.
- For 300dpi printers, make sure to choose the driver starting with a "3" and for 200dpi printer, the driver name should start with a "2".
- The printer driver should *NOT* have FGL in the name.
- Connect the Practical Automation iTX printer to your computer and follow the Add Printer wizard for proper printer installation
- Print a test page
- Right click on the Practical Automation iTX printer and select Printer Properties
- Click on the General Tab
- Click on Print Test Page
- Test page indicates successful installation
- Right click on your printer, and select Set as Default Printer
Printer Settings
- When on the Printers screen, right click on your Practical Automation printer and select Printing Preferences
- On the Layout tab, change the orientation to Landscape
- Click the "Advanced..." button and select the Paper Size as L = 5.50 x 2.00
- Click OK and OK again on Printing Preferences
Settings for Chrome
- Launch Chrome
- Open the Print Settings (For Mac click ⌘ + P, For PC click Control + P)
- Change the Layout to LandScape
- Click "More Settings"
- Change the Margins from "Default" to "None"
- Ensure that Headers and Footers are not checked
- Check to see that the Paper Size is set to the correct ticket stock dimensions
(Skip down to Box Office Ticket Printing Instructions if using Chrome)
Settings for Internet Explorer
- Launch Internet Explorer
- Click on File and select Page Setup
- Under Paper Options, the Paper Size and Page Orientation should already be set to L = 5.50 x 2.00 and Landscape, respectively.
- Check the Enable Shrink-to-Fit Option
- Margin settings should be set as follows:
- Left: 0
- Right: 0
- Top: 0
- Bottom: 0
- Under Headers and Footers
- Set all Header options to Empty
- Set all Footer options to Empty
- Click OK
Internet Explorer does not allow you to set the Practical Automation iTX printer's left and right margins to 0. Since the margins will probably default back to 0.08 or 0.01, depending on the version of Windows you are running. So, we will need to manually set the margins to 0 by editing the registry.
Registry Changes for Internet Explorer
(Skip down to Box Office Ticket Printing Instructions if using Chrome)
Improperly modifying the registry can result in adverse effects to your system. We recommend that you have someone with a technical background help you with these modifications and that a registry backup is made prior to making any changes.
For Windows 7
- Click the Start Menu and type regedit into the search field. Click Enter which will open the Registry Editor.
- The window should automatically open to the "Page Setup" Folder for Internet Explorer.
- Double click on margin_bottom and set the value to 0, Click OK. Repeat for all 4 margins.
Registry Changes For Windows XP or Vista
- Click the Start Menu and type regedit into the search field. Click Enter which will open the Registry Editor.
- Click on the HKEY_CURRENT_USER folder
- Click on the Software folder
- Click on the Microsoft folder
- Under the Internet Explorer folder, click on the PageSetup sub-folder
- Double click on margin_bottom and set the value to 0, Click OK. Repeat for all 4 margins.
IMPORTANT NOTE: Any modification made to the browser's Page Setup section will result in having to reset the margin_bottom, margin_left, margin_right, and margin_top registry values to 0 in the registry. Tickets will not properly print if the registry settings are not set back to 0.
Box Office Ticket Printing Instructions
Printing Tickets from Customer Orders
If you created multiple shipping options for your event, the customer can choose which ticket option they prefer when checking out.
- Log in to ThunderTix
- Navigate to the desired event
- Open the Guest List
- Review the Shipping Option column and click the blue ticket graphic beneath the Print column. A new window will open with the tickets to print.
- From your browser, click on the File tab
- Select the Print option. (Shortcut: hold down the CTRL key and press P)
- The Practical Automation iTX printer should be set as your default printer, and will automatically be highlighted as the printer you will send the tickets to. It is important to ensure that no other printers are accidentally selected during this process.
- Click the Print button
Printing On-Demand Tickets
Box office managers and staff members can process orders for customers either by phone or in person. At the final stage of the order process when payment is approved, staff can print tickets immediately to set aside for Will Call or give directly to the customer.
- Process an order.
- On the final screen when the order is Approved, click the link, "Print to Thermal Printer"
A new window will open with the tickets to print.
- From your browser, click on the File tab
- Select the Print option. (Shortcut: hold down the CTRL key and press P)
- The Practical Automation iTX printer should be set as your default printer, and it will automatically be highlighted as the printer you will send the tickets to. Make sure no other printers are accidentally selected during this process.
- Click the Print button
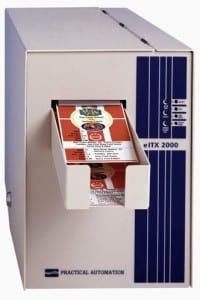
ThunderTix offers thermal ticket printing integration for standard ticket stock. Thermal ticket printing with the Practical Automation iTX is a professional-grade solution for rapid printing when it matters most — on the night of the show! With the thermal printing upgrade, your box office staff can print tickets “on-demand” after each order is completed with the click of a button.

Need to buy a Thermal Printer?
We are able to offer great discounts through bulk purchases for thermal ticket printers. Contact us to learn more about our the Practical Automation iTX thermal ticket printers including our most popular printer configuration, a 300dpi small desktop printer with automatic cutter and external ticket storage.