Pricing for General Admission Events (No Seating Chart)
For an event that has only ONE performance:
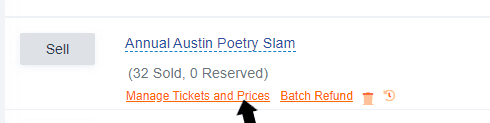
- Head to Events
- Click Event Manager
- Click Manage for the event you wish to edit
- Click Manage Tickets and Prices
- Click on the pencil icon to edit a ticket type
- Make changes to any or all of the fields
- Click on the disk icon to save your changes
- If you wish to change the order in which the tickets appear to your customers, use the "handle" () under the Reorder column to "drag and drop" the ticket types in your preferred order.

For an event with TWO OR MORE performances:
You have the option of making changes that apply to all performances of your event or to a single performance.
- Head to Events
- Click on Events Manager
- Click Manage for the event you wish to edit
- Click Manage Tickets and Prices below the first performance date
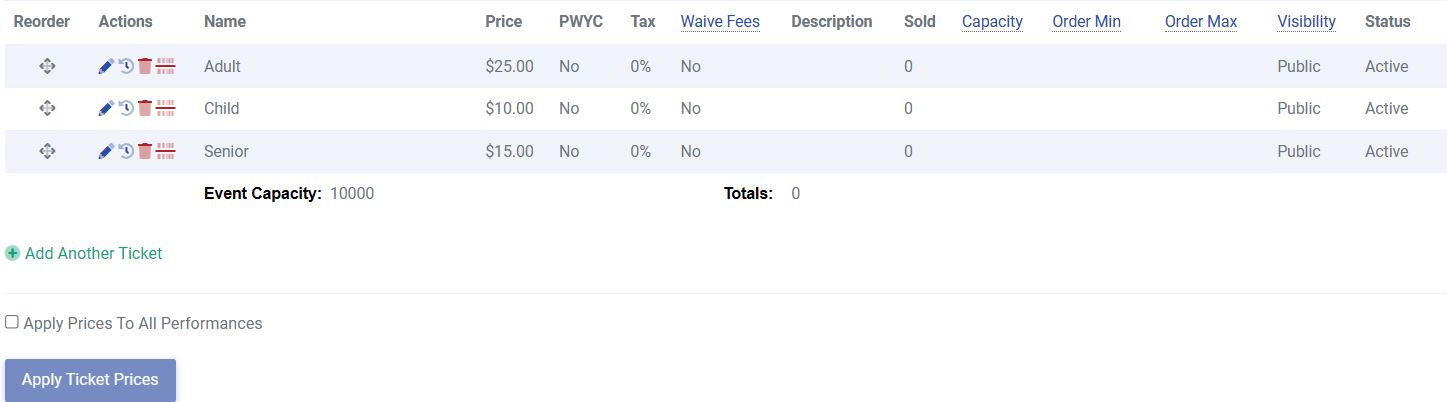
- You will see all ticket types listed, with editable fields. At this point, you can delete a ticket type, add a ticket type, and/or make edits to any field shown.
- Once you have made your edits, you can apply this change to all performance dates by first checking the box for Apply Prices To All Performances and then clicking the blue button to Apply Ticket Prices. See below.
Editing Performances - General Admission AND Reserved Seating
Any time you want to make an edit to an individual performance you will need to get to your list of Dates & Times.
- Head to Events
- Click on Event Manager
- Click Manage next to the desired event name
- You’ll immediately be taken into the Dates & Times to see a list of all performances
- From this page, you can edit any of the following by clicking right on them:
Event Name, Date, Capacity (for general admission events only), Access (Public or Private). See below. - Click on any Performance Name to change it. Click the blue check box to save or the "x" to Cancel changes.
- Click on the Performance Capacity to change it. Click the blue check box to save or the "x" to cancel changes.
For an event with TWO OR MORE performances:
You have the option of making changes that apply to all performances of your event or to a single performance.
- Head to Events
- Click on Events Manager
- Click Manage for the event you wish to edit
- Click Manage Tickets and Prices below the first performance date
- You will see all ticket types listed, with editable fields. At this point, you can delete a ticket type, add a ticket type, and/or make edits to any field shown.
- Once you have made your edits, you can apply this change to all performance dates by first checking the box for Apply Prices To All Performances and then clicking the blue button to Apply Ticket Prices. See below.
Manage Pricing for Reserved Seating Events
By default, when an event is created with a seating chart, all sections will automatically be set using the Pricing displayed in the “Tickets” tab for that event.
For seating charts with TWO OR MORE sections with varied pricing per section
- Click on the Event Manager tab under Events
- Click “Manage” next to the desired event name
- You’ll immediately be taken into the Dates & Times to see a list of all performances
- Click on Mange Tickets and Prices.
- You'll be taken to the pricing set for all sections within the chart assigned to the event
- To price a specific section, use the drop-down menu to the left and select the appropriate section
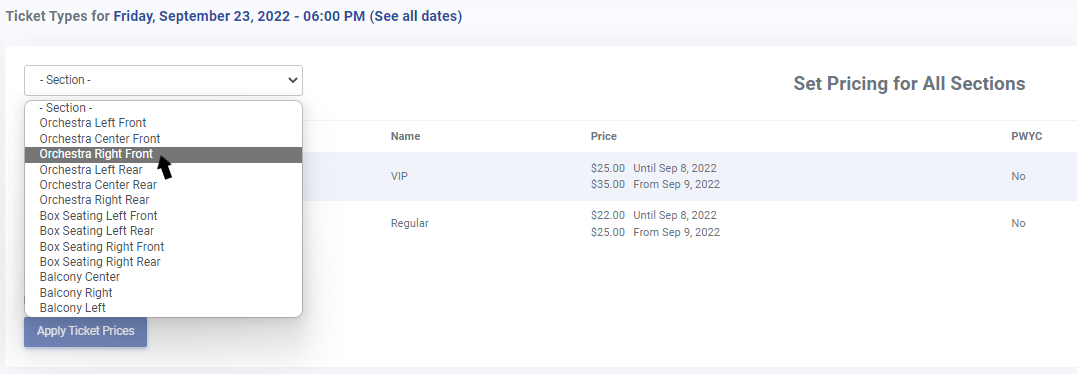
- The tickets associated with the selected section will appear
- Use the red trash icon to delete any prices that do not apply to THIS section. Click "Add Another Ticket" if you need to add additional price tiers for this section.
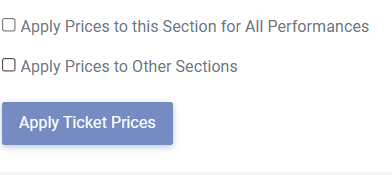
- Once you have made your edits, you will choose to EITHER Apply Prices to Other Sections (for this performance only) OR Apply Ticket Prices to all performances (applies to every performance in this event to save time in setting the pricing)
- Once the ticket prices are saved, you have the option to reorder the tickets the way you want customers to see them during the purchase